2015年8月29日 星期六

【Android】Serializable vs Parcelable


我們都知道在Android內如果要傳送資料必須透過Intent或Bundle

在送基本型態(int,String,boolean..)時應該沒有什麼爭議

但是如果要送一個 Object 呢?

這時你就有兩個選擇了,你可以使用
● Serializable
● Parcelable

稍微解釋一下這兩個interface

Serializable 是 Java 的 interface
Parcelable 是 Android 的 interface
在使用他們時,你的 Class 必須 implements 他們

既然都可以達到資料傳送的目的
那為什麼Android還要特地出一個 Parcelable 給大家使用呢?

當然是因為 performance 的問題
Serializable 在使用上非常方便
只需要 implements 他就結束了,但是
Serializable 在Java就一直被大家所詬病
他是利用反射來實例化物件
但這種方法會造成大量的temporary objects(臨時物件)
VM也要花時間對這些對象進行garbage collection(GC)

當然 Parcelable 就不是利用反射了
而是我們在 implement 他時就實作他的method
透過泛型直接給定他Class


下面有個簡單的Sample
讓我們實際測試看看兩者之間的效能落差


1.專案配置


很簡單,就一個Layout 與 Activity 與兩個 Model Object


2.Layout


<LinearLayout xmlns:android="http://schemas.android.com/apk/res/android"
    xmlns:tools="http://schemas.android.com/tools"
    android:layout_width="match_parent"
    android:layout_height="match_parent"
    android:orientation="vertical"
    tools:context=".MainActivity">

    <TextView
        android:layout_marginBottom="20dp"
        android:padding="10dp"
        android:text="測試執行50000次的\nParcelable/Serializable效能差異"
        android:layout_width="wrap_content"
        android:layout_height="wrap_content" />

    <TextView
        android:padding="10dp"
        android:text="Parcelable 所花時間(ms):"
        android:id="@+id/pTimeTv"
        android:layout_width="wrap_content"
        android:layout_height="wrap_content" />

    <TextView
        android:padding="10dp"
        android:text="Serializable 所花時間(ms):"
        android:id="@+id/sTimeTv"
        android:layout_width="wrap_content"
        android:layout_height="wrap_content" />

    <TextView
        android:textColor="#cc0000"
        android:padding="10dp"
        android:text="效能落差(ms):"
        android:id="@+id/parcelableTimeTv"
        android:layout_width="wrap_content"
        android:layout_height="wrap_content" />

    <Button
        android:layout_width="wrap_content"
        android:layout_height="wrap_content"
        android:text="執行測試"
        android:id="@+id/button"
        />
</LinearLayout>


3.Java Code


DataP

import android.os.Parcel;
import android.os.Parcelable;

public class DataP implements Parcelable{
    private int a;
    private String b;
    private boolean c;

    public DataP(int a, String b, boolean c) {
        this.a = a;
        this.b = b;
        this.c = c;
    }

    public int getA() {
        return a;
    }

    public void setA(int a) {
        this.a = a;
    }

    public String getB() {
        return b;
    }

    public void setB(String b) {
        this.b = b;
    }

    public boolean isC() {
        return c;
    }

    public void setC(boolean c) {
        this.c = c;
    }

    protected DataP(Parcel in) {
        a = in.readInt();
        b = in.readString();
    }

    public static final Creator<DataP> CREATOR = new Creator<DataP>() {
        @Override
        public DataP createFromParcel(Parcel in) {
            return new DataP(in);
        }

        @Override
        public DataP[] newArray(int size) {
            return new DataP[size];
        }
    };

    @Override
    public int describeContents() {
        return 0;
    }

    @Override
    public void writeToParcel(Parcel dest, int flags) {
        dest.writeInt(a);
        dest.writeString(b);
    }
}

DataS

import java.io.Serializable;

public class DataS implements Serializable {
    private int a;
    private String b;
    private boolean c;

    public DataS(int a, String b, boolean c) {
        this.a = a;
        this.b = b;
        this.c = c;
    }

    public int getA() {
        return a;
    }

    public void setA(int a) {
        this.a = a;
    }

    public String getB() {
        return b;
    }

    public void setB(String b) {
        this.b = b;
    }

    public boolean isC() {
        return c;
    }

    public void setC(boolean c) {
        this.c = c;
    }
}

MainActivity
在兩個for迴圈內做5萬次的 put 與 get (單純模擬)
最後把執行時間相減來做出比較

import android.support.v7.app.AppCompatActivity;
import android.os.Bundle;
import android.view.View;
import android.widget.Button;
import android.widget.TextView;

public class MainActivity extends AppCompatActivity {
    @Override
    protected void onCreate(Bundle savedInstanceState) {
        super.onCreate(savedInstanceState);
        setContentView(R.layout.activity_main);

        final Button button = (Button)findViewById(R.id.button);
        final TextView pTimeTv = (TextView)findViewById(R.id.pTimeTv);
        final TextView sTimeTv = (TextView)findViewById(R.id.sTimeTv);
        final TextView parcelableTimeTv = (TextView)findViewById(R.id.parcelableTimeTv);

        button.setOnClickListener(new View.OnClickListener() {
            @Override
            public void onClick(View v) {
                Bundle bundle = new Bundle();

                long pStart = System.currentTimeMillis();
                for(int i=0;i<50000;i++){
                    DataP p1 = new DataP(i,String.valueOf(i),true);
                    bundle.putParcelable("keyP" + i, p1);
                    DataP p2 = bundle.getParcelable("keyP"+i);
                }
                long pEnd = System.currentTimeMillis();
                long sStart = System.currentTimeMillis();
                for(int i=0;i<50000;i++){
                    DataS s1 = new DataS(i,String.valueOf(i),true);
                    bundle.putSerializable("keyS" + i,s1);
                    DataS s2 = (DataS)bundle.getSerializable("keyS"+i);
                }
                long sEnd = System.currentTimeMillis();

                long pSub = pEnd - pStart;
                long sSub = sEnd - sStart;
                long parcelableSub = (sSub>pSub)?(sSub-pSub):(pSub-sSub);

                pTimeTv.setText("Parcelable 所花時間(ms):"+pSub);
                sTimeTv.setText("Serializable 所花時間(ms):"+sSub);
                parcelableTimeTv.setText("效能落差(ms):"+parcelableSub);
            }
        });
    }
}


4.總結


從我的不專業測試得知結果為
創建5萬個物件(序/反列化)兩者之間時間差為0.7
Parcelable 大約是 Serializable 的兩倍

試想如果今天是10萬或20萬個物件呢,整體速度都會被拖慢!
你的App使用起來就會很卡頓!
所以還是多使用 Parcelable 吧!

兩者優缺點比較:

Serializable:
● 程式碼簡潔,閱讀容易
● 反序列化時需要強制轉型
● 速度較慢

Parcelable:
● 程式碼較複雜
● 速度較快,佔用資源較少

國外的說法是兩者之間效能差約10倍

個人是覺得沒那麼誇張
不過兩倍以上是有的


2015年8月21日 星期五

【Android】SignalR 使用介紹

Blogger

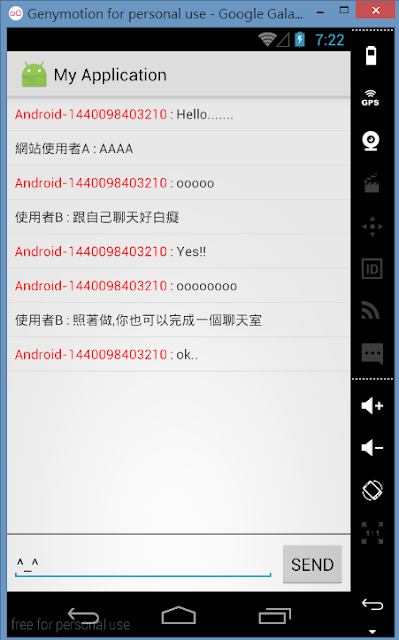
這篇要來介紹的是 如何在Android使用SignalR完成簡易聊天室

我們要完成上圖畫面

Server 端的實作可以參考我的這篇文章
MVC - 使用SignalR完成簡易聊天室


1.Add SignalR Lib


別懷疑!微軟沒有上傳SignalR的Maven位置
原始碼請至github下載(有點雷.趕時間別去踩)
或是你可以跟我一樣來這裡直接下載jar檔引用
除了要引用signalr-client-sdk還有Gson也要


Manifest記得要加上網路權限

<uses-permission android:name="android.permission.INTERNET"/>


2.Layout


兩個檔案,主畫面與listview的item


先看activity_main的layout

<?xml version="1.0" encoding="utf-8"?>
<LinearLayout xmlns:android="http://schemas.android.com/apk/res/android"
    xmlns:tools="http://schemas.android.com/tools"
    android:layout_width="match_parent"
    android:layout_height="match_parent"
    android:orientation="vertical">

    <ListView
        tools:listitem="@layout/item"
        android:id="@+id/chatLv"
        android:layout_width="match_parent"
        android:layout_height="0dp"
        android:layout_weight="1"
        android:divider="#ddd"
        android:dividerHeight="1dp"
        />

    <View
        android:layout_width="match_parent"
        android:layout_height="1dp"
        android:layout_marginBottom="2dp"
        android:layout_marginTop="2dp"
        android:background="#000" />

    <LinearLayout
        android:layout_width="match_parent"
        android:layout_height="wrap_content"
        android:layout_gravity="center_vertical"
        android:orientation="horizontal"
        android:padding="5dp">
        <EditText
            android:id="@+id/messageEt"
            android:layout_width="0dp"
            android:layout_height="wrap_content"
            android:layout_weight="1"
            android:padding="5dp"
            />
        <Button
            android:id="@+id/sendBtn"
            android:layout_width="wrap_content"
            android:layout_height="wrap_content"
            android:layout_marginLeft="5dp"
            android:text="SEND"
            />
    </LinearLayout>
</LinearLayout>

item的layout

<?xml version="1.0" encoding="utf-8"?>
<LinearLayout xmlns:android="http://schemas.android.com/apk/res/android"
    android:orientation="horizontal"
    android:padding="5dp"
    android:layout_width="match_parent"
    android:layout_height="match_parent">

    <TextView
        android:id="@+id/nameTv"
        android:layout_width="wrap_content"
        android:layout_height="wrap_content"
        android:padding="3dp"
        android:text="Name"
        />
    <TextView
        android:layout_width="wrap_content"
        android:layout_height="wrap_content"
        android:text=":"
        />
    <TextView
        android:id="@+id/messageTv"
        android:layout_width="wrap_content"
        android:layout_height="wrap_content"
        android:padding="3dp"
        android:text="Message"
        />
</LinearLayout>


2.Java Code


這邊有三個檔案,稍微解釋一下:
MainActivity(主畫面)
ChatAdapter(ListView Adapter)
ChatData(資料容器)


先說MainActivity,裡面的四個常數的意義
HUB_URL:就是你signalR的DomainName+/signalr
HUB_NAME:Hub檔案名稱
HUB_EVENT_NAME:Hub觸發的事件名稱
HUB_METHOD_NAME:Call的method名稱
下面這張圖可以清楚對照,如果不知道藍框裡面是什麼東西
請先看這篇


public class MainActivity extends Activity {
    private static final String HUB_URL = "[你的url]/signalr";
    private static final String HUB_NAME = "你的Hub name";
    private static final String HUB_EVENT_NAME = "你的事件名稱";
    private static final String HUB_METHOD_NAME = "你的Call method name";
    private SignalRFuture<Void> mSignalRFuture;
    private HubProxy mHub;
    private String mName;

    private ChatAdapter mChatAdapter;
    private ListView mChatLv;
    private EditText mMessageEt;
    private Button mSendBtn;

    @Override
    protected void onCreate(Bundle savedInstanceState) {
        super.onCreate(savedInstanceState);
        setContentView(R.layout.activity_main);
        mChatLv = (ListView)findViewById(R.id.chatLv);
        mMessageEt = (EditText)findViewById(R.id.messageEt);
        mSendBtn = (Button)findViewById(R.id.sendBtn);
        mName = "Android-"+System.currentTimeMillis();
        mChatAdapter = new ChatAdapter(this,0,new ArrayList<ChatData>(),mName);

        mChatLv.setAdapter(mChatAdapter);
        mSendBtn.setOnClickListener(new View.OnClickListener() {
            @Override
            public void onClick(View view) {
                try {
                    String message = mMessageEt.getText().toString();
                    mHub.invoke(HUB_METHOD_NAME, mName, message).get();
                    mMessageEt.setText("");
                } catch (InterruptedException e) {
                    e.printStackTrace();
                } catch (ExecutionException e) {
                    e.printStackTrace();
                }
            }
        });

        HubConnection connection = new HubConnection(HUB_URL);
        mHub = connection.createHubProxy(HUB_NAME);
        mSignalRFuture = connection.start(new ServerSentEventsTransport(connection.getLogger()));
        //可以理解為訊息or事件監聽器
        mHub.on(HUB_EVENT_NAME, new SubscriptionHandler2<String, String>() {
            @Override
            public void run(String name,String message) {
                //使用AsyncTask來更新畫面
                new AsyncTask<String,Void,ChatData>(){
                    @Override
                    protected ChatData doInBackground(String... param) {
                        ChatData chatData = new ChatData(param[0],param[1]);
                        return chatData;
                    }
                    @Override
                    protected void onPostExecute(ChatData chatData) {
                        mChatAdapter.add(chatData);
                        mChatLv.smoothScrollToPosition(mChatAdapter.getCount()-1);
                        super.onPostExecute(chatData);
                    }
                }.execute(name,message);
            }
        }, String.class,String.class);

        //開啟連線
        try {
            mSignalRFuture.get();
        } catch (InterruptedException e) {
            e.printStackTrace();
        } catch (ExecutionException e) {
            e.printStackTrace();
        }
    }

    @Override
    protected void onDestroy() {
        //關閉連線
        mSignalRFuture.cancel();
        super.onDestroy();
    }
}

ChatData資料容器

public class ChatData {
    private String name;
    private String message;

    public ChatData(String name, String message) {
        this.name = name;
        this.message = message;
    }

    public String getName() {
        return name;
    }
    public String getMessage() {
        return message;
    }
}

ChatAdapter,這邊比較需要講一下的只有
我將自己的聊天內容標註為紅色而已

public class ChatAdapter extends ArrayAdapter<ChatData>{
    private String mName;
    public ChatAdapter(Context context, int resource, List<ChatData> objects,String mName) {
        super(context, resource, objects);
        this.mName = mName;
    }

    private class ViewHolder {
        TextView nameTv;
        TextView messageTv;
    }

    @Override
    public View getView(int position, View convertView, ViewGroup parent) {
        ChatData chatData = getItem(position);
        ViewHolder holder;
        if(convertView==null){
            holder = new ViewHolder();
            convertView = LayoutInflater.from(getContext()).inflate(R.layout.item, null);
            holder.nameTv = (TextView) convertView.findViewById(R.id.nameTv);
            holder.messageTv = (TextView) convertView.findViewById(R.id.messageTv);
            convertView.setTag(holder);
        } else {
            holder = (ViewHolder) convertView.getTag();
        }

        holder.nameTv.setText(chatData.getName());
        holder.messageTv.setText(chatData.getMessage());

        if(chatData.getName().equals(mName)){
            holder.nameTv.setTextColor(Color.RED);
        }
        return convertView;
    }
}


3.完成了!來看效果吧


android與brower對話


2015年8月20日 星期四

【MVC】使用SignalR完成簡易聊天室

這篇要來介紹的是,如何使用MVC 5打造聊天室的SignalR快速入門

原始程式我是參考這篇

我們要完成的是下面這張畫面,廢話不多說,馬上開始吧!


1.開啟你的visual studio新建一個空的MVC專案


驗證方式選擇不驗證


2.打開你的NuGet安裝套件


安裝SignalR的套件


安裝完成後會有5個套件打勾


如果你這時很調皮的執行了一下專案,他會直接給你看
不要害怕,請看第三步


3.加入Startup檔案


在專案內加入Startup class


using Owin;
using Microsoft.Owin;

//請注意namespace,複製貼上後請更改為你取的
[assembly: OwinStartup(typeof(SignalRtest.Startup))]
namespace SignalRtest
{
    public class Startup
    {
        public void Configuration(IAppBuilder app)
        {
            // Any connection or hub wire up and configuration should go here
            app.MapSignalR();
        }
    }
}

這時候再執行一次專案,應該就正常了


4.設定你的SignalR Hub


簡單來說就是設定你的SignalR Server
在專案內加入一個資料夾,取名叫Hubs
在Hubs加入一個class,取名叫TestHubs


using System;
using System.Web;
using Microsoft.AspNet.SignalR;

namespace SignalRtest.Hubs
{
    public class TestHubs : Hub
    {
        public void Send(string name, string message)
        {
            // Call the addNewMessageToPage method to update clients.
            Clients.All.addNewMessageToPage(name, message);
        }
    }
}


5.編寫View畫面


開啟你的Index.cshtml,將下面的code貼上
要注意的是你的js是否引用到正確位置(可能之後改版不是2.2.0了)
還有框起來的地方,檔名要對上


<h2>聊天室</h2>
<div class="container">
    <input type="text" id="name" class="form-control" placeholder="姓名" />
    <input type="text" id="message" class="form-control" placeholder="輸入內容" />
    <input type="button" id="sendmessage" value="Send" class="btn btn-primary" />
    <ul id="discussion"></ul>
</div>
@section scripts {
    <script src="~/Scripts/jquery.signalR-2.2.0.min.js"></script>
    <script src="~/signalr/hubs"></script>
    <script>
        $(function () {
            var testHub = $.connection.testHubs;
            testHub.client.addNewMessageToPage = function (name, message) {
                $('#discussion').append('<li><strong>' + htmlEncode(name)
                    + '</strong>: ' + htmlEncode(message) + '</li>');
            };
            $('#message').focus();
            $.connection.hub.start().done(function () {
                $('#sendmessage').click(function () {
                    testHub.server.send($('#name').val(), $('#message').val());
                    $('#message').val('').focus();
                });
            });
        });

        function htmlEncode(value) {
            var encodedValue = $('<div />').text(value).html();
            return encodedValue;
        }
    </script>
}


6.完成了!來看效果吧


可以開兩個browser來測試效果比較明顯


2015年8月19日 星期三

【Android】Azure Storage 使用介紹

微軟的Azure是一套很強大的雲端平台

Azure提供非常非常多的服務

我們最常使用的包括Web站台、SQL Database、儲存體等等

優點是支援各種語言(Java , Node.js , ASP , php ....等等)好處很多,而且收費便宜

想要使用Azure請先自行去微軟申請,這邊就不多加介紹如何申請了(首次使用免費一個月)

這篇是介紹如何使用Android 操作 Azure儲存體


1.建立Azure儲存體服務


進入你的Azure訂用帳戶,新增儲存體的服務
新增 -> 資料服務 -> 儲存體 -> 快速建立
填寫想要的URL 與 離你最近的位置 與 備份選項


按下建立後,要等一小段時間,好了之後可以看到畫面是這樣子
點選剛剛建立的儲存體進入管理畫面


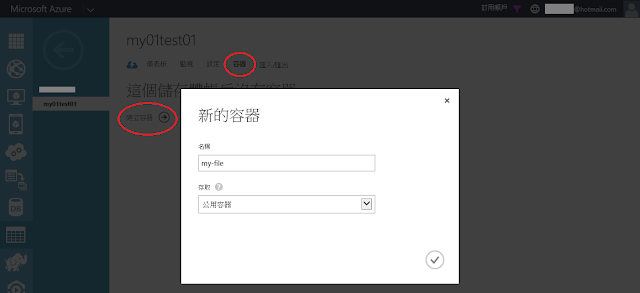
按下容器 -> 建立容器
填寫名稱 與 存取權限(這邊因為要給Android存取,所以選公用)


好了之後回到儀表板,點選下面的管理存取金鑰
我們要記下2個東東,儲存體帳戶名稱 與 金鑰 (可以先隨便開個記事本把他們複製貼上)


2.回到Android


在gradle內Add Azure Lib


compile 'com.microsoft.azure.android:azure-storage-android:0.5.1'


3.在專案內建立一個AsyncTask


這是用來上傳檔案的Task

CONTAINER_NAME 是你剛剛自己取的
storageConnectionString 要依照格式
AccountName=剛剛複製下來的儲存體帳戶名稱
AccountKey=剛剛複製下來的金鑰


public class FileUploadTask extends AsyncTask {
    //容器名稱
    private static final String CONTAINER_NAME = "my-file";
    //連結字串
    private static final String storageConnectionString =
            "DefaultEndpointsProtocol=http;" +
            "AccountName=my01test01;" +
            "AccountKey=tTP+zfmrUGb6FhiPBW/fRNCrjnfwX1QkJIvLpMp0BpWvFhgGjhlq6Syn5DFGgMjTsvPwhC8GmB6db/jklDpzPw==";
    private ProgressDialog mDialog;
    private File mUploadFile;
    private Context mContext;

    public FileUploadTask(Context context,File uploadFile) {
        mContext = context;
        mUploadFile = uploadFile;
    }

    @Override
    protected void onPreExecute() {
        mDialog = new ProgressDialog(mContext);
        mDialog.setTitle("Tips");
        mDialog.setMessage("Uploading...");
        mDialog.setCancelable(false);
        mDialog.show();
        super.onPreExecute();
    }

    @Override
    protected Boolean doInBackground(Void... params) {
        boolean status;
        try {
            CloudStorageAccount storageAccount = CloudStorageAccount.parse(storageConnectionString);
            CloudBlobClient blobClient = storageAccount.createCloudBlobClient();
            CloudBlobContainer container = blobClient.getContainerReference(CONTAINER_NAME);
            container.createIfNotExists();

            String blobName = System.currentTimeMillis()+".txt";
            CloudBlockBlob blockBlob = container.getBlockBlobReference(blobName);
            blockBlob.upload(new FileInputStream(mUploadFile), mUploadFile.length());
            status = true;
        } catch (Exception e) {
            status = false;
        }
        return status;
    }

    @Override
    protected void onPostExecute(Boolean status) {
        if (status == true) {
            Toast.makeText(mContext,"檔案上傳成功", Toast.LENGTH_SHORT).show();
        }else{
            Toast.makeText(mContext,"檔案上傳失敗", Toast.LENGTH_SHORT).show();
        }
        mDialog.cancel();
        super.onPostExecute(status);
    }
}


4.主畫面與測試


在Activity裡面就一個Button,layout就不貼了
按下後產生一個檔案並上傳


public class MainActivity extends Activity {

    @Override
    protected void onCreate(Bundle savedInstanceState) {
        super.onCreate(savedInstanceState);
        setContentView(R.layout.activity_main);
        Button button = (Button)findViewById(R.id.button1);
        button.setOnClickListener(new View.OnClickListener() {
            @Override
            public void onClick(View v) {
                try {
                    //在Cache內產生檔案
                    String fileContent = "現在時間="+System.currentTimeMillis();
                    File saveFile = new File(MainActivity.this.getCacheDir(),"Test.txt");
                    FileOutputStream outStream = new FileOutputStream(saveFile);
                    outStream.write(fileContent.getBytes());
                    outStream.close();

                    //上傳
                    FileUploadTask fileUploadTask = new FileUploadTask(MainActivity.this,saveFile);
                    fileUploadTask.execute();
                }catch (Exception e){
                    e.printStackTrace();
                }
            }
        });
    }
}


5.完成了!來看效果吧


按下按鈕後,跳出Dialog,結束後顯示Toast提示


回到Azure管理平台看看,果然上傳一個檔案了


將檔案下載下來,裡面的內容無誤

2015年5月1日 星期五

About me

從大學時期就投入 Android 開發 (當時的Android版本是1.5),至今累積約6年的開發經驗,專長是 android native 與 ASP.NET MVC 開發,擅長使用各種 architecture, design pattern 來提升程式的開發速度與架構,喜歡嘗試新技術並實作於 project 中,但也有小心避免成為 Hype driven developer。對於產品開發,我也是盡可能的遵循MVP精神,以最快的速度開發出產品,放上市場測試需求,並觀察使用者習慣做快速調整。對於人生觀方面,則總是希望能透過自己微小的 programming 能力,替這個世界做一些正向的、有意義的事:)


Projects:


BaZi Astrology 八字命理
  This App provides you an easy way to explore BaZi and assists you to better understand yourself, your lover, friends, family or even your boss.

EasyNote 輕鬆記事
  Convenient tool with rich content and easy operation which can help you note down in your cell-phone or tablet device. (其他介紹)

ET Accounts Manager 輕鬆記帳
  Personal finance tool. It can help you easily record your financial transactions and give you a quick and simple record editing experience.

● AnnTracker 交友
  Google play上架作品,利用手機Gps定位功能搭配google map完成定位與追蹤,開放式的交友平台,即時聊天系統。

● Wish8
  Google play上架作品,是一個全新概念的 app,可以在 Wish8 上面選擇自己想要的商品 (也就是許願),就有機會收到自己最想要的禮物!

跳蛙公車
  新北市政府公車資訊與車票訂購App

Volvo Service +
  富豪汽車車主專用app,提供汽車預約保養,升級,精品訂購,汽車美容,道路救援,等功能。

傳遞e富足
  Google play上架作品,美商美樂家的企業app,提供影音學習,日曆提醒,QR code掃描,等功能。

● 就是要丟鞋
  Google play上架作品,可以宣洩情緒的小遊戲。

● 日月光麻吉網
  日月光半導體企業員工內部使用app,提供特約商店查詢,失物招領,醫護室查詢,每周餐廳菜單查詢,社團活動影音查詢等功能。

● Bluetooth控制燈具
  利用手機藍芽功能,連接arduino藍芽接收器,並控制多組燈具,替朋友的公司開發設計,從最初的市場調查、成本計算、IC選版、產品研發,皆由我和與另一位工程師合作完成。

● NotePad
  客製化的手機藍芽軟體,透過精密量尺連接藍芽發送器,發送數據給手機並且記錄下來,手機部分接收數據後,可生成excel檔案傳送給電腦,或雲端列印下來。

● 匯豐汽車競標app
  提供匯豐汽車會員競標二手車服務

● 餐廳點菜系統
  提供外場人員使用app點菜,即時傳送至後端的real-time系統

● 餐廳官方網站訂購網站
  綠界平台的金流串接

Others